


Motion designers in 2026 often face a tough choice: they need high brightness and accurate HDR performance for color grading in Premiere Pro or DaVinci Resolve, yet many affordable monitors produce distracting blooming (light halos) around bright UI elements like timelines and cursors on dark backgrounds. The good news is that 2026 firmware improvements and the 1,152-zone configuration in budget Mini-LED displays make them viable when paired with a simple “mode-switching” workflow—using lower dimming for most UI work and higher only for final HDR review. This approach delivers strong performance at a fraction of the $5,000 pro-display price while avoiding OLED’s burn-in risks during long static-interface sessions.

Why Blooming Happens in Dark UI Workflows
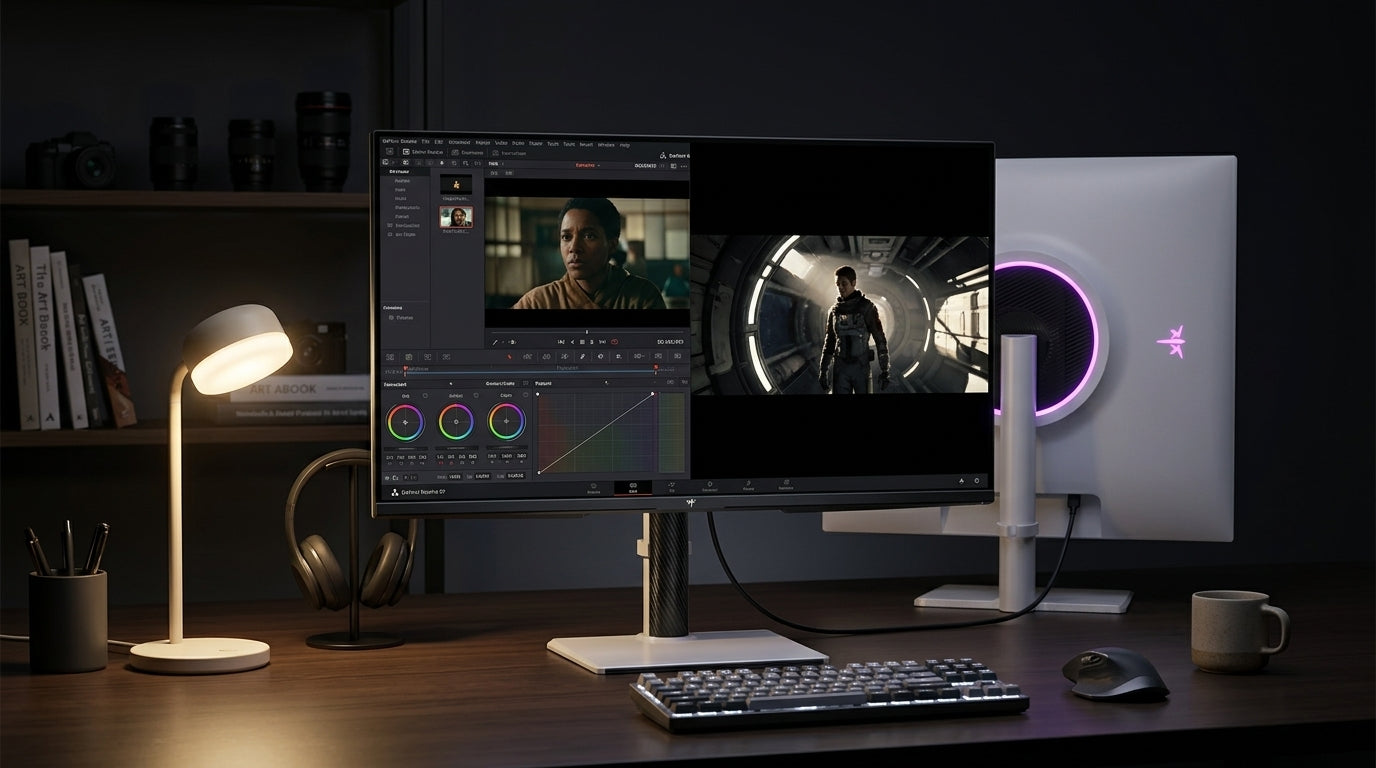
Blooming occurs because each Mini-LED backlight zone is physically larger than individual pixels. When a bright element such as a white timeline marker or cursor sits against a pure black interface, light spills into neighboring dark zones, creating visible halos. Motion designers encounter this problem far more often than gamers because their daily work in Premiere Pro, After Effects, or DaVinci Resolve relies on high-contrast dark-mode interfaces for hours at a time. The sharp contrast between a bright cursor and deep black panels is one of the most demanding tests for local-dimming algorithms.
In real editing sessions, these halos can hide subtle mask edges or make precise keyframing harder. Sensitivity to blooming varies—some designers find it background noise while others find it disruptive—so understanding the physical cause helps set realistic expectations before purchase.
Translating 2026 Specs into Practical Thresholds: VESA HDR1000+
For professional color grading, not all HDR labels deliver usable performance. VESA’s DisplayHDR 1.2 standard requires hardware-level 2D local dimming plus stricter Delta-ITP color accuracy for the 1000 and 1400 tiers, making HDR400 effectively “SDR+” for grading work. Without local dimming, the entire panel must brighten to show a single highlight, which destroys black levels and prevents accurate contrast decisions.
The DisplayHDR 1400 tier further demands a sustained full-screen brightness of 900 nits. This stable luminance floor lets colorists maintain consistent grading across bright scenes without the panel thermally throttling or applying aggressive auto-brightness limiting mid-task. For creators, this threshold separates monitors that merely advertise HDR from those that support reliable HDR mastering. Check your workflow first: if you grade content mastered to 1,000 nits or higher, anything below the 1000 tier is likely a poor fit.
The 1152-Zone Sweet Spot: Balancing Budget and Blooming
For 27-inch creator displays in 2026, 1,152 local dimming zones strike a practical balance between cost, processing demands, and halo reduction, according to manufacturer performance data. Moving from 576 to 1,152 zones noticeably shrinks halo size around UI elements, yet jumping to 2,300+ zones delivers diminishing returns for most dark-interface work while roughly doubling the price.
The real key is adopting a mode-switching workflow rather than treating the monitor as set-and-forget. Use “Medium” or “Off” dimming for the 90 % of your day spent on keyframing, masking, and timeline work in dark UIs. Switch to “High” only during the final 10 % HDR review and grading pass. This protocol keeps the interface stable while reserving peak contrast for content checks. As this guide to local dimming zones explains, higher zone counts reduce halo size but do not eliminate the need for thoughtful preset management.
Mini-LED Mode Switching: Best Fit by Workflow
This chart helps visualize the likely pattern in typical creator setups: Mini-LED with a lower dimming preset is usually the safer daily choice for UI-heavy timeline work, while a higher dimming preset fits occasional HDR review better. It highlights the trade-offs motion designers juggle between blooming control, burn-in risk, luminance stability, and workflow friction.
View chart data
| Scenario | Blooming/Halo Risk | Burn-in Risk | Luminance Stability | Workflow Friction |
|---|---|---|---|---|
| UI-heavy timeline work | 2.0 | 1.0 | 2.0 | 1.0 |
| HDR review | 1.0 | 2.0 | 2.0 | 2.0 |
Mini-LED vs. OLED: Choosing the Right Tool for Motion Design
Many designers wonder whether they should simply buy an OLED panel to eliminate blooming. While OLED delivers perfect blacks, its organic emitters carry a persistent burn-in risk from the static toolbars, timelines, and palettes that remain on screen for 8–10 hours daily. Mini-LED, built with inorganic LEDs, avoids permanent image retention, making it the safer long-term choice for heavy static-UI workflows.
OLED panels also apply aggressive auto-brightness limiting (ABL) to manage heat and power, which can drop sustained brightness below the 900-nit floor needed for consistent HDR1400-grade mastering. Mini-LED maintains a more stable luminance floor, letting you grade longer without mid-task shifts in perceived brightness. Blooming remains a visible but predictable variable on Mini-LED; you can manage it through presets and mode switching, whereas OLED’s burn-in risk and ABL behavior represent harder workflow limits.
High-end 2026 WOLED and QD-OLED panels have improved mitigation, yet the fundamental physics of organic decay still matters for users with heavy timeline exposure. If your day consists mostly of motion graphics with long-open interfaces, Mini-LED usually offers better overall stability. For purely cinematic review work with minimal static elements, OLED may still be preferable.

Pro Setup: Calibrating for Minimal Haloing in Resolve and Premiere
To get the most from a budget Mini-LED, treat calibration and preset management as part of the purchase. Experts recommend “Medium” or “Normal” local-dimming presets for UI-heavy editing because aggressive “High” modes can exaggerate halos around small bright highlights. This choice slightly raises the black floor but produces a more stable interface for masking and keyframing. Toggle to “High” only when you need maximum contrast for final HDR checks.
Mac users encounter additional friction. The nominal 90 W USB-C power delivery can sag to 45–65 W under sustained HDR1400 loads, causing a MacBook Pro battery to drain slowly during GPU-intensive renders. Many also experience unreliable wake-from-sleep over a single USB-C cable, often requiring a cable reseat or monitor power cycle. DDC/CI software for brightness control is frequently inconsistent with current firmware, so plan on using the monitor’s physical joystick for adjustments. A dedicated Thunderbolt dock or MagSafe charger removes most of these pain points.
Start your setup by downloading the latest firmware, then run a hardware calibration targeting your primary working color space. These steps turn the monitor from a potential source of frustration into a reliable daily driver. For more on managing HDR mastering variations, see our guide to how HDR content mastering inconsistency should shape your display calibration decisions.
Affordable Mini-LED for Creators: KTC M27 Series Breakdown
The KTC M27 series targets exactly the middle ground many motion designers seek. All three models use 1,152 zones on 27-inch panels and deliver strong color coverage suitable for video editing and grading after calibration. They are not reference-grade mastering monitors and still require the mode-switching workflow described above, yet they provide noticeably better HDR impact and contrast than standard IPS displays at prices well below premium studio options.
The M27P6 stands out for 4K timelines and detailed color work. Its 3840×2160 resolution at 160 Hz, combined with HDR1400 certification and 98 % DCI-P3 coverage, gives sharp text and ample headroom for 4K deliverables. Full ergonomic stand, 99.5 % sRGB, and ΔE<2 potential after calibration make it a strong fit for freelancers or small studios moving beyond basic IPS screens.
For users who want HDR capability without the 4K premium, the M27T6 offers 2560×1440 at 180 Hz with HDR1400 and 96 % DCI-P3. The slightly lower pixel density is rarely noticeable at typical 27-inch viewing distances, and the lower price leaves budget for a calibration probe or Thunderbolt dock. Its VA panel variant delivers deeper native contrast that pairs well with local dimming.
The M27T6S trades a bit of peak brightness (HDR1000) for even stronger color volume (99 % Adobe RGB) and a 200 Hz refresh rate. Hybrid creator-gaming users who occasionally need esports-level speed while still grading in Resolve will appreciate the extra responsiveness and wide-gamut accuracy. All three models share the same zone count and firmware foundation, so the choice largely comes down to resolution needs and whether your projects benefit more from 4K detail or higher refresh and color volume.
Before buying any of these, verify that your room lighting, calibration routine, and tolerance for occasional mode changes align with the realities of Mini-LED. Those who adopt the workflow usually find the combination of 1,000+ nit HDR, accurate color, and zero burn-in risk worth the modest daily management.
Is a Budget Mini-LED Right for My Motion Design Workflow?
Can Mini-LED blooming be completely eliminated in dark editing interfaces?
No. Blooming is a physical limitation of local dimming zones that remain larger than individual pixels. 1,152-zone panels and 2026 firmware reduce halo size significantly, especially with “Medium” presets, but some visibility around high-contrast UI elements is expected. Designers sensitive to halos should test in their specific software or consider OLED for purely cinematic review work where static UI is minimal.
How does Mini-LED compare with OLED for 8-hour daily editing sessions?
Mini-LED is generally safer for long static-UI days because it cannot suffer permanent burn-in from timelines and tool palettes. OLED’s perfect blacks come with burn-in risk and aggressive auto-brightness limiting that can disrupt consistent HDR grading. Use Mini-LED when workflow stability and hardware longevity matter more than absolute black levels.
What VESA HDR tier should motion designers target for color grading?
Target HDR1000 or HDR1400. These tiers mandate local dimming and stricter color accuracy, plus a 900-nit sustained brightness floor that keeps grading consistent. HDR400 lacks the hardware to isolate highlights and behaves like enhanced SDR for contrast-critical tasks.
Do KTC M27 monitors work well with MacBook Pro setups?
They deliver excellent specs but require extra hardware and habits. Expect possible power-delivery sag under heavy HDR loads and occasional USB-C wake-from-sleep failures. Most users add a Thunderbolt dock or MagSafe charger and accept manual joystick adjustments because DDC/CI control remains unreliable. With those accommodations the monitors perform very well for color work.
Should I calibrate a budget Mini-LED for professional use?
Yes. Factory color is usually good but not reference-level. A hardware calibration probe targeting your working color space (Rec. 709, DCI-P3, or BT.2020) plus the mode-switching workflow described earlier lets the monitor deliver accurate, usable results for client deliverables without the cost of a $5,000 reference display.


